Nailing Pattern For Roof Sheathing
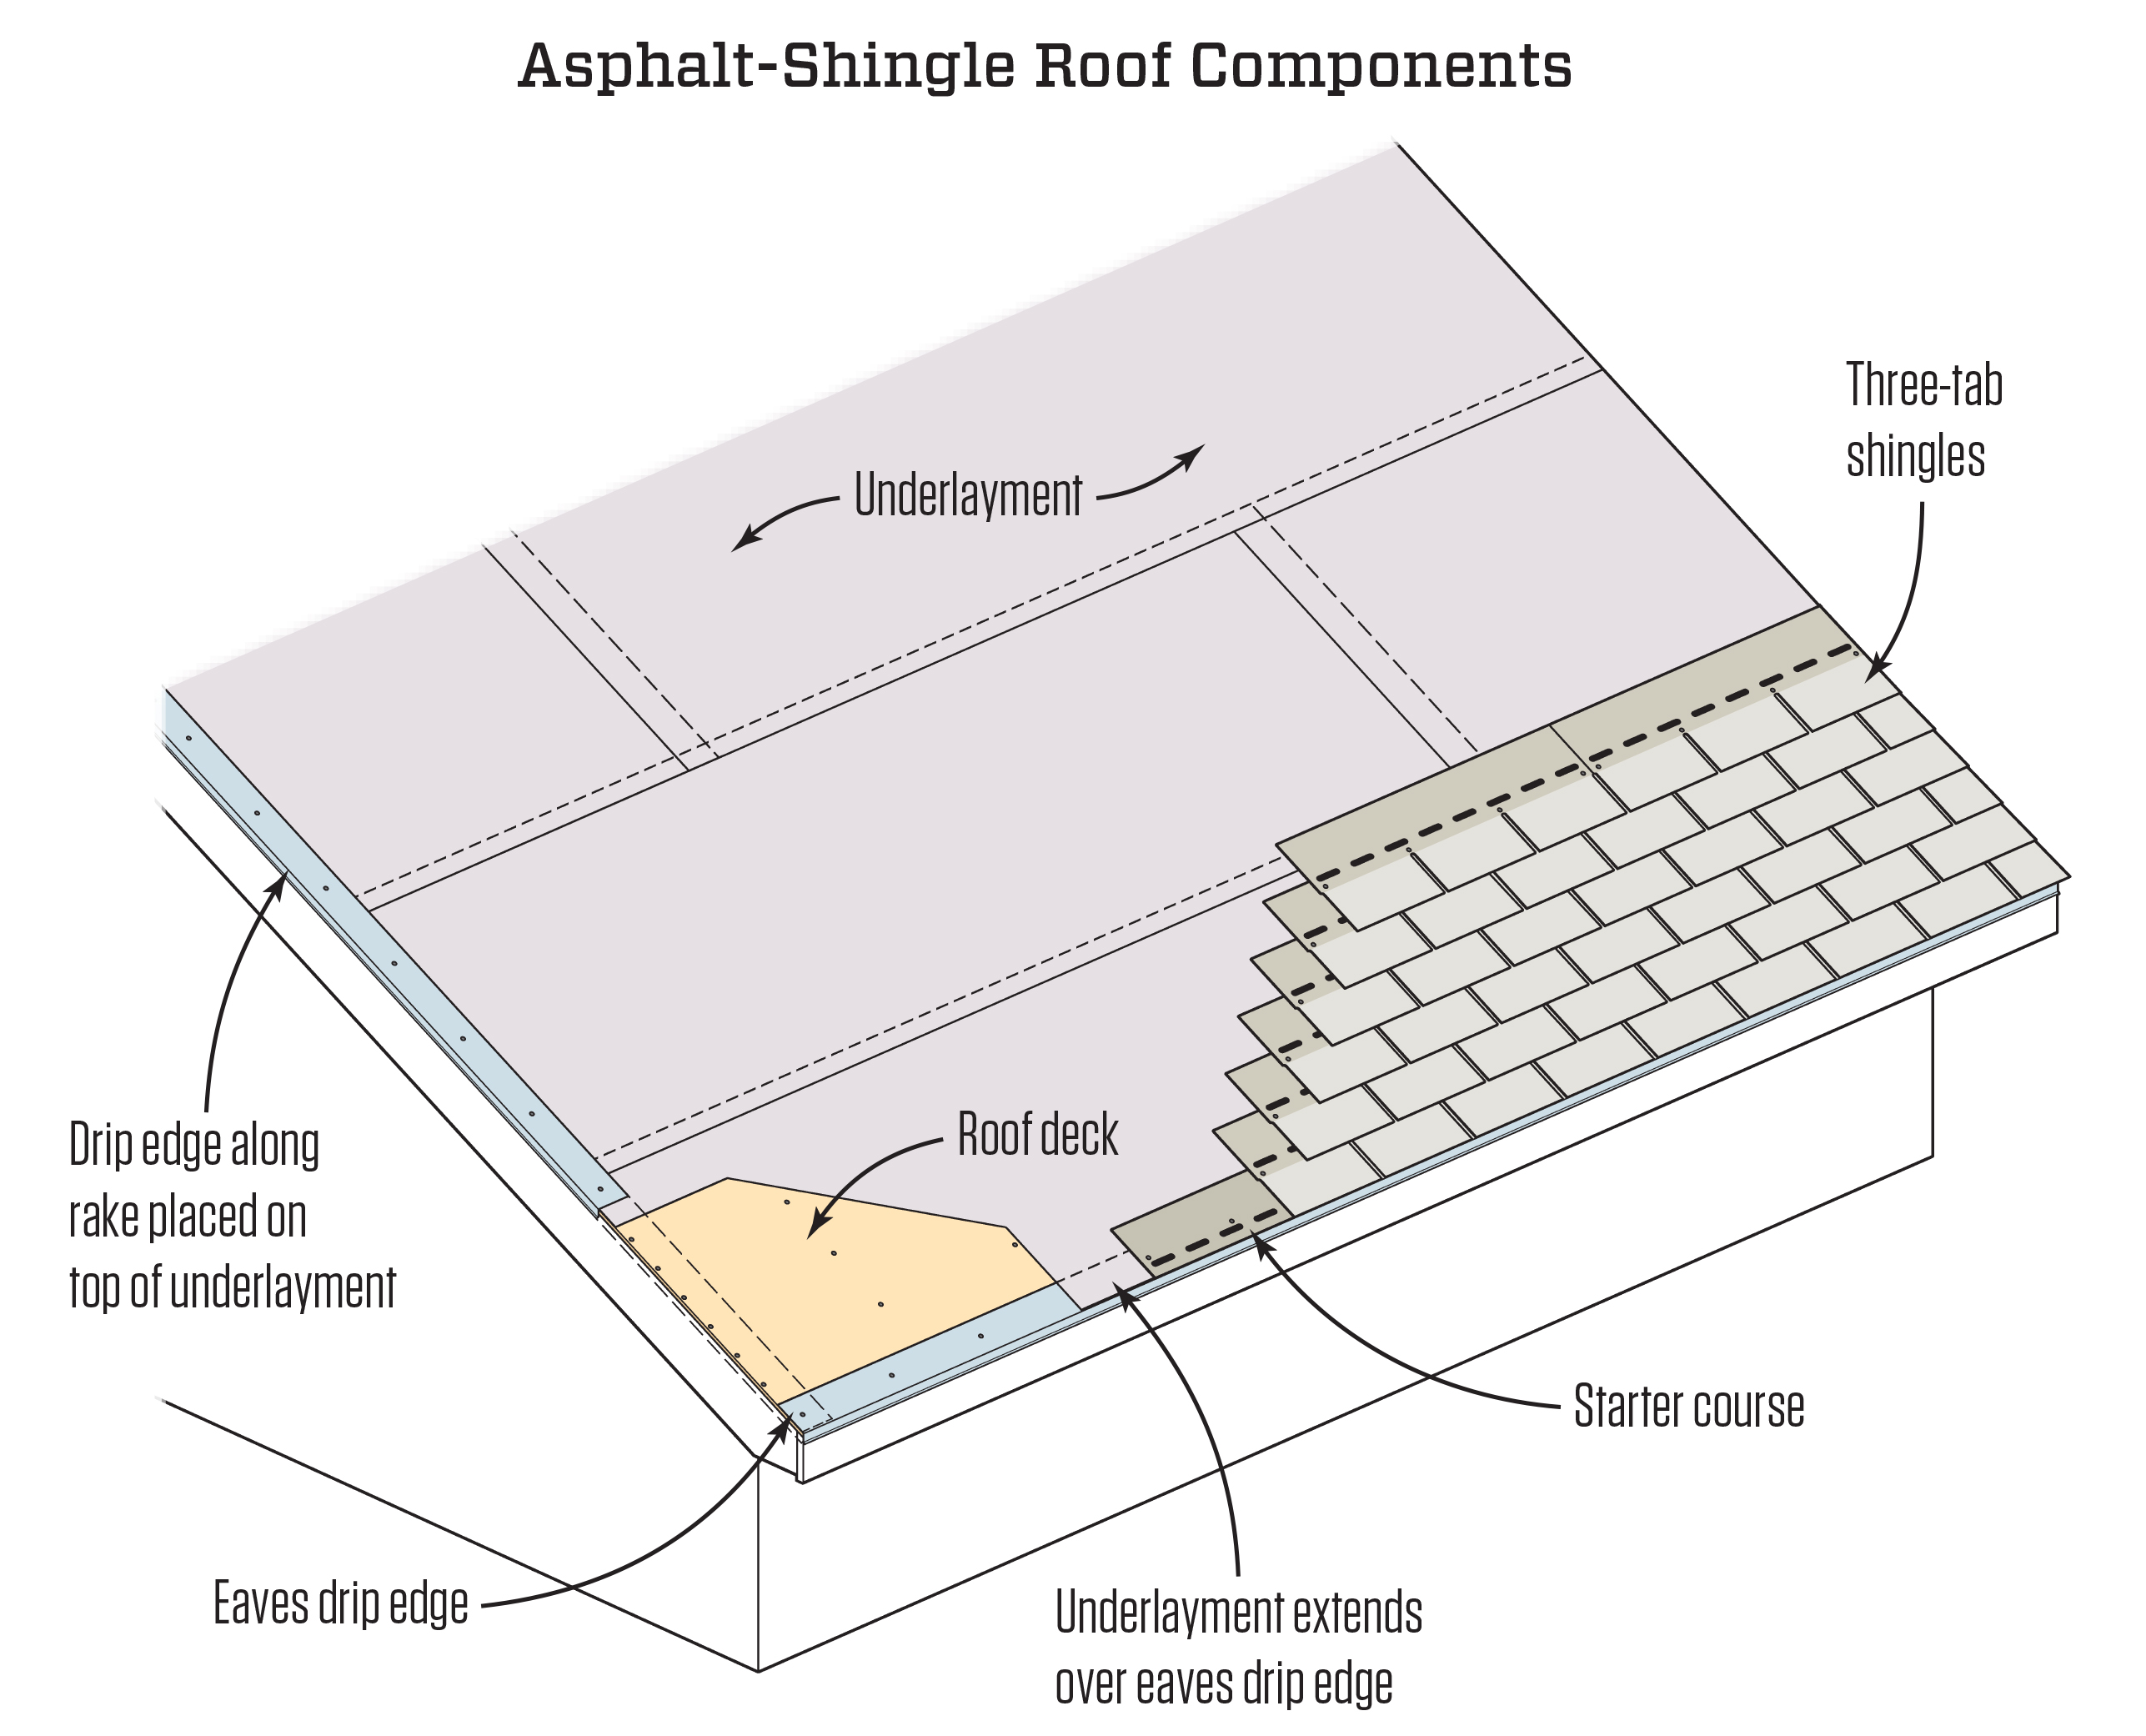
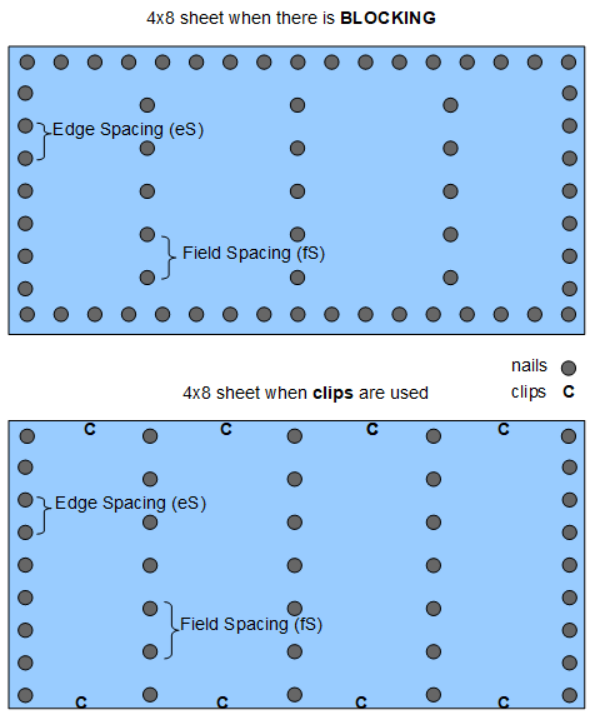
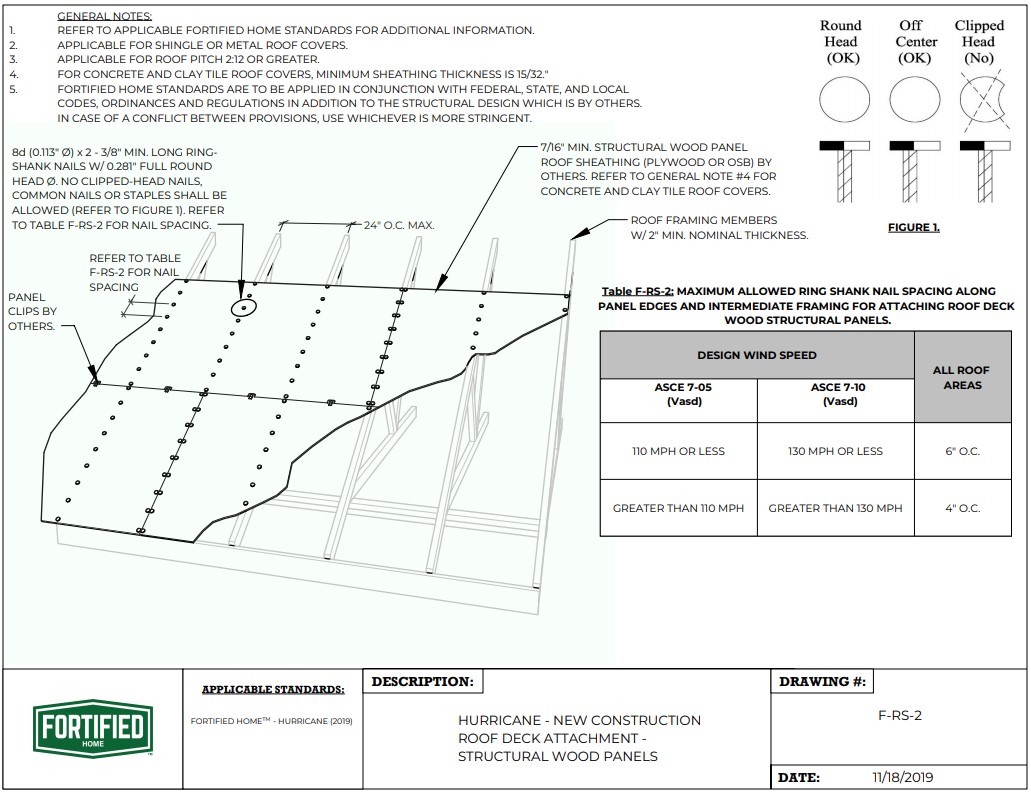
Nailing Pattern For Roof Sheathing - These schedules were calculated to provide resistance to wind uplift pressure as required by most codes. Place the nails closer together and use more of them to create a stronger roof. Cover roof sheathing with shingle underlayment felt. Install shingles according to manufacturer recommendations. Properly fasten panels (including fastening and spacing hints) step 4: Web discover the advantages and disadvantages of using nails or screws for roof sheathing. Ventilate the roof according to current building codes. Check the nailing surface is level. Always check for level nailing surface. Learn about panel layout, nailing off, and roof staging. Always check for a level. Web discover the advantages and disadvantages of using nails or screws for roof sheathing. Install shingles according to manufacturer recommendations. These schedules were calculated to provide resistance to wind uplift pressure as required by most codes. Provide roof ventilation according to building codes (see hints below and figure 2). Always check for level nailing surface. The nailing pattern for roof sheathing requires using longer nails with a larger shank, diameter, and head. Check the nailing surface is level. Properly fasten panels (including fastening and spacing hints) step 4: Cover roof sheathing with shingle underlayment felt. Properly fasten panels (including fastening and spacing hints) step 4: Install shingles according to manufacturer recommendations. Place the nails closer together and use more of them to create a stronger roof. Check the nailing surface is level. Always check for level nailing surface. Web discover the advantages and disadvantages of using nails or screws for roof sheathing. Ventilate the roof according to current building codes. Cover roof sheathing with shingle underlayment felt. The nailing pattern for roof sheathing requires using longer nails with a larger shank, diameter, and head. Web what is the nailing pattern for roof sheathing? Learn about panel layout, nailing off, and roof staging. Place the nails closer together and use more of them to create a stronger roof. Web tips that will make sheathing a roof with plywood easier. Install shingles according to manufacturer recommendations. Always check for level nailing surface. Provide roof ventilation according to building codes (see hints below and figure 2). Learn how to choose the right fastener based on your needs and the specific conditions of your roofing project. Always check for a level. Web what is the nailing pattern for roof sheathing? Always check for level nailing surface. Always check for a level. Place the nails closer together and use more of them to create a stronger roof. Install shingles according to manufacturer recommendations. Web discover the advantages and disadvantages of using nails or screws for roof sheathing. Ventilate the roof according to current building codes. Web what is the nailing pattern for roof sheathing? Properly fasten panels (including fastening and spacing hints) step 4: Check the nailing surface is level. Learn about panel layout, nailing off, and roof staging. Always check for level nailing surface. Learn about panel layout, nailing off, and roof staging. Check the nailing surface is level. Web tips that will make sheathing a roof with plywood easier. Place the nails closer together and use more of them to create a stronger roof. Web discover the advantages and disadvantages of using nails or screws for roof sheathing. These schedules were calculated to provide resistance to wind uplift pressure as required by most codes. The nailing pattern for roof sheathing requires using longer nails with a larger shank, diameter, and head. Check the nailing surface is level. Install shingles according to manufacturer recommendations. Always check for level nailing surface. Learn about panel layout, nailing off, and roof staging. Always check for a level. Place the nails closer together and use more of them to create a stronger roof. Web what is the nailing pattern for roof sheathing? Learn how to choose the right fastener based on your needs and the specific conditions of your roofing project. Web what is the nailing pattern for roof sheathing? Web discover the advantages and disadvantages of using nails or screws for roof sheathing. Learn about panel layout, nailing off, and roof staging. Install shingles according to manufacturer recommendations. Check the nailing surface is level. Check the nailing surface is level. Place the nails closer together and use more of them to create a stronger roof. Always check for a level. Learn about panel layout, nailing off, and roof staging. The nailing pattern for roof sheathing requires using longer nails with a larger shank, diameter, and head. Always check for level nailing surface. Cover roof sheathing with shingle underlayment felt. Install shingles according to manufacturer recommendations. Provide roof ventilation according to building codes (see hints below and figure 2). Web what is the nailing pattern for roof sheathing? These schedules were calculated to provide resistance to wind uplift pressure as required by most codes. Learn how to choose the right fastener based on your needs and the specific conditions of your roofing project.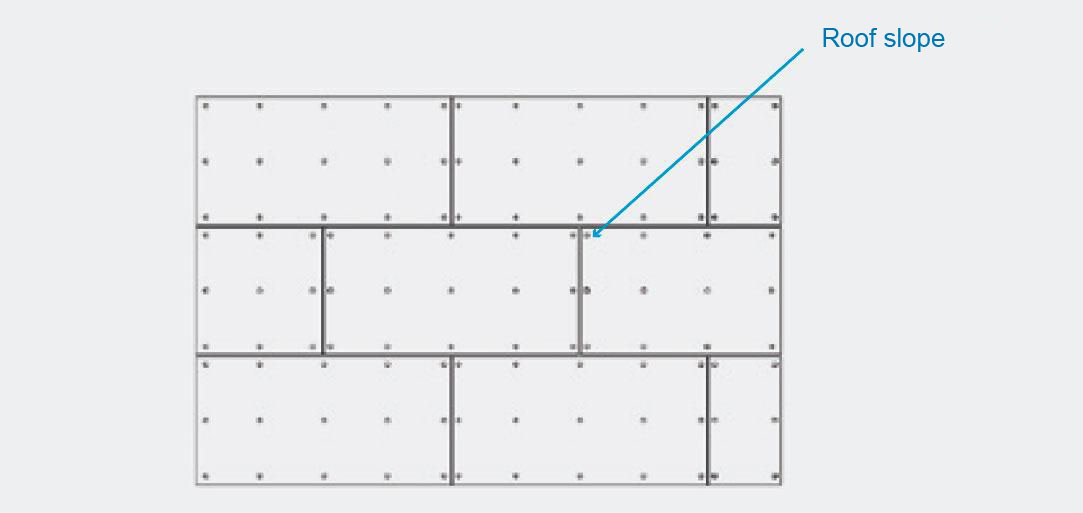
Roof Sheathing Nail Pattern Nail Ftempo
Plywood and OSB Are Ideal Materials for Roof Sheathing Systems
APA Builder Tips Proper Installation of APA Rated Sheathing for Roof

Roof Sheathing Nail Pattern Nail Ftempo
Roof Sheathing Nail Pattern Nail Ftempo

Roof Sheathing Nail Pattern Nail Ftempo
Roof Sheathing Nail Pattern Nail Ftempo
Roof Sheathing Nail Pattern Nail Ftempo
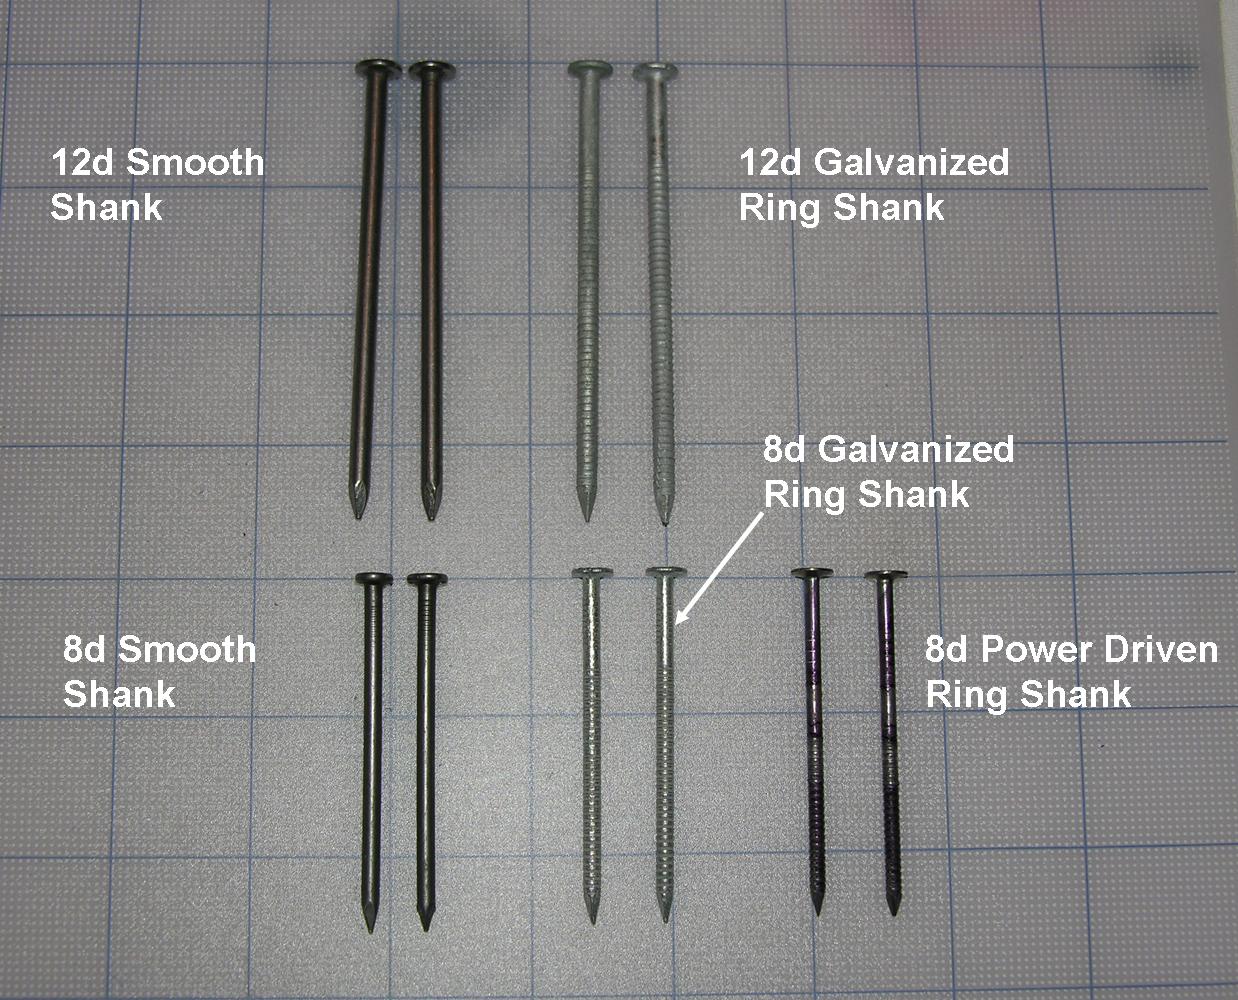
Nails for Gable Roof Sheathing
Roof Sheathing Nail Pattern My Bios
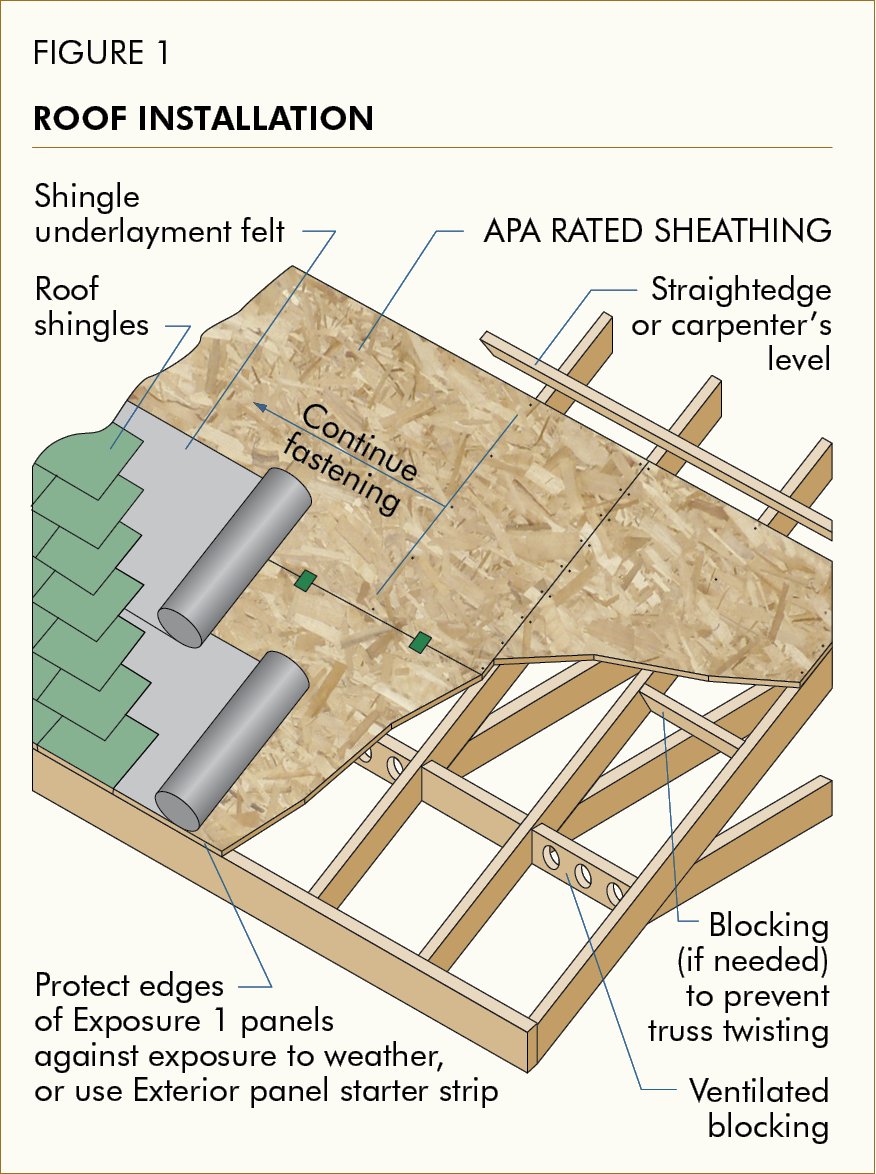
Ventilate The Roof According To Current Building Codes.
Web Tips That Will Make Sheathing A Roof With Plywood Easier.
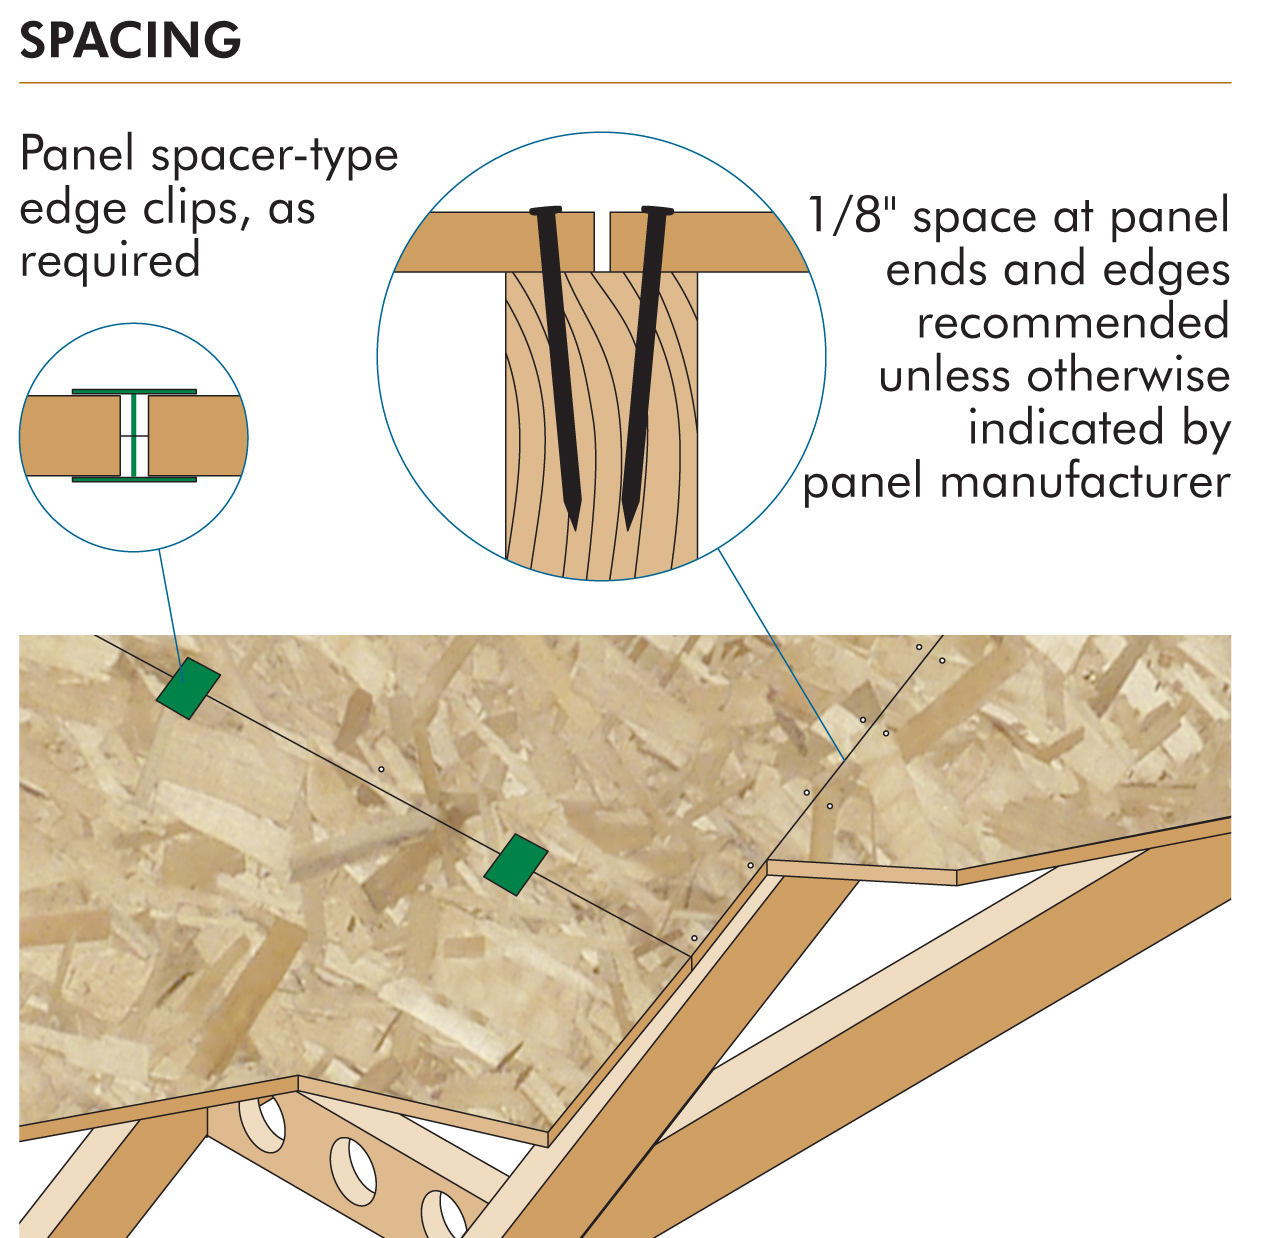
Properly Fasten Panels (Including Fastening And Spacing Hints) Step 4:
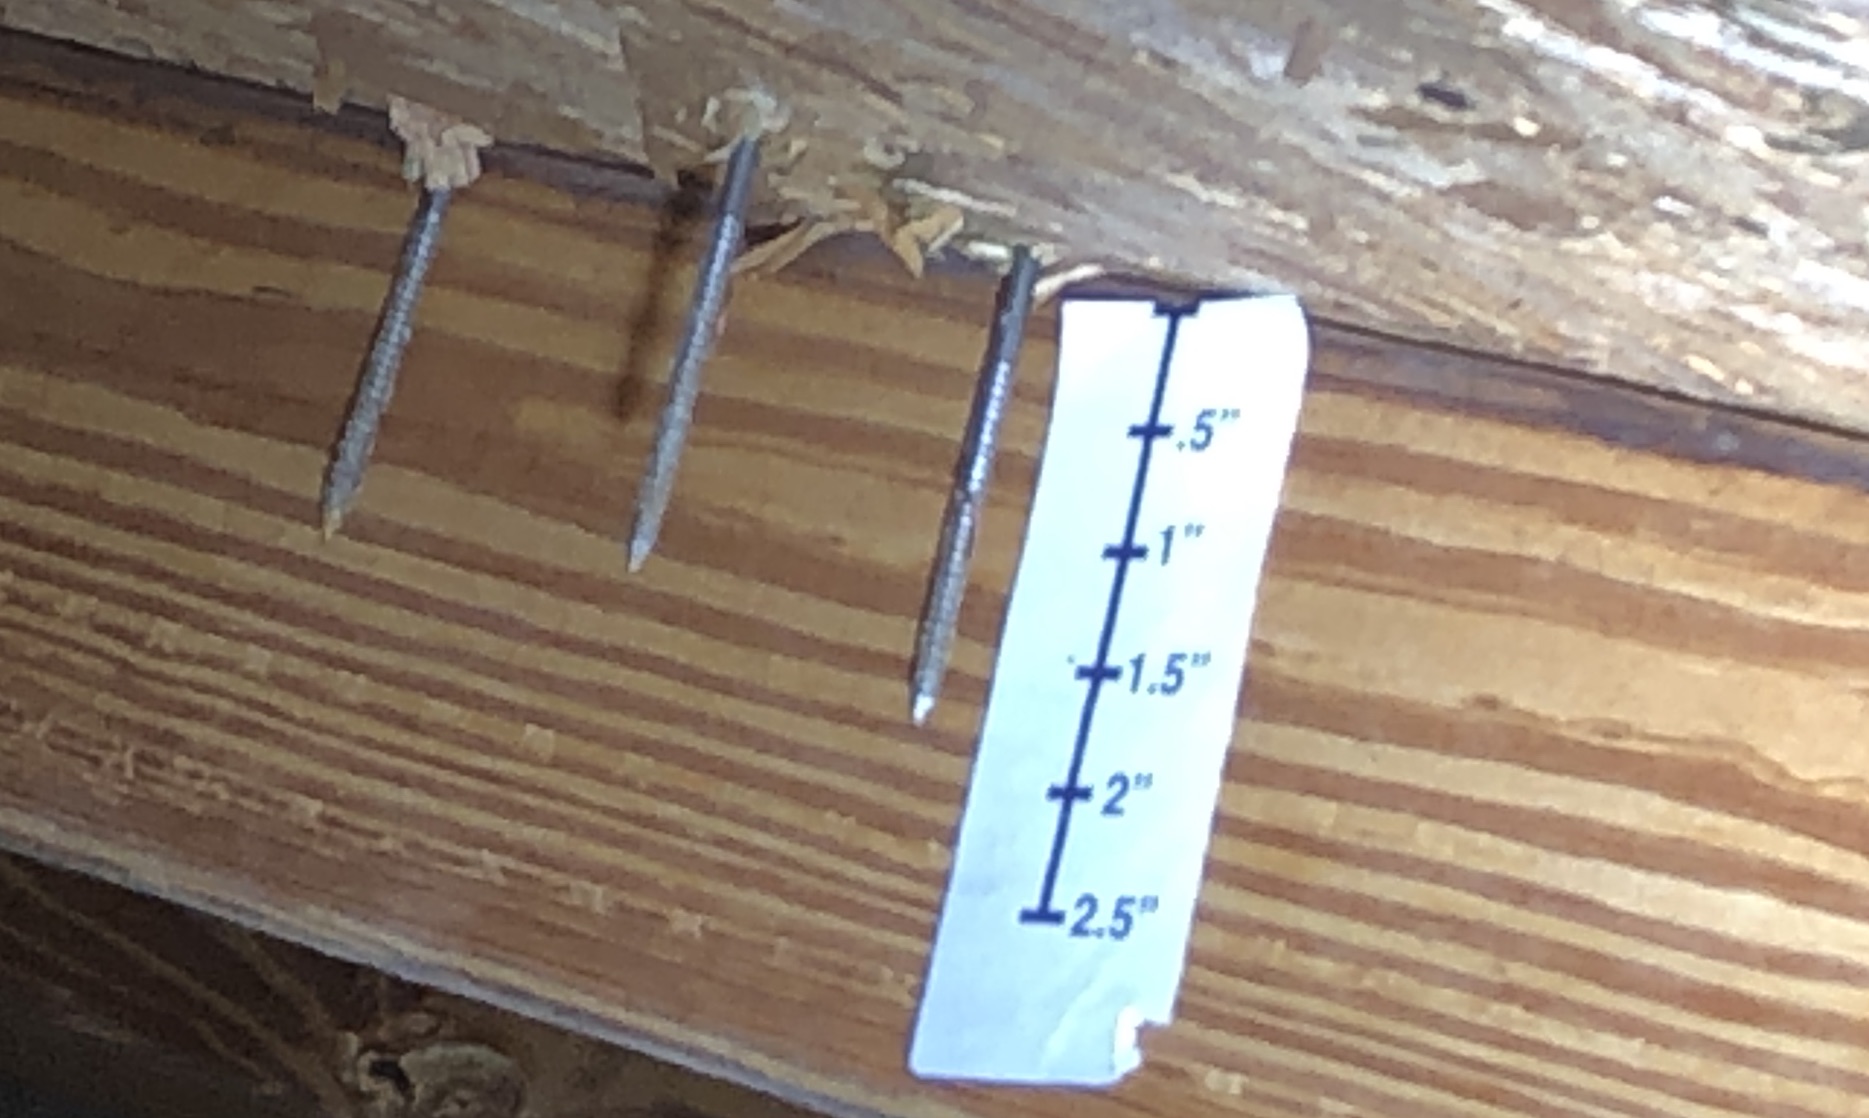
Web Discover The Advantages And Disadvantages Of Using Nails Or Screws For Roof Sheathing.
Related Post: